WiFiManager với ESP8266 – tự động kết nối, cấu hình, quản lý SSID và Password

Trong bài hướng dẫn này, bạn sẽ biết cách làm thế nào để dùng thư viện WiFiManager cho module ESP8266. WiFiManager cho phép bạn kết nới tới nhiều Access Point (AP) khác nhau mà không phải nạp lại code. Ngoài ra, bạn có thể thêm các tham số riêng và quản lý nhiều tài khoản mạng wifi.
WiFiManager làm việc với ESP8266 như thế nào
WiFiManager là thư viện chính bổ sung vào các dự án sử dụng ESP8266, sử dụng thư viện này bạn không phải code tài khoản mạng wifi vào trong chương trình. Module ESP sẽ tự kết nối vào mạng hoặc cài đặt một Access Point để bạn có thể cấu hình mạng.
Khi ESP8266 khởi động, nó được cấu hình ở chế độ Station, và cố gắng kết nối mạng wifi nếu thông tin mạng wifi đã được lưu trước đó.
Nếu quá trình bị lỗi, ESP sẽ chuyển sang chế độ Access Point
Sử dụng máy tính hoặc thiết bị di dộng để kết nối vào thiết bị, tên mặc định là AutoConnectAP
Sau khi thiết lập kết nối tới AutoConnectAP, bạn nhập địa chỉ IP mặc định 192.168.4.1 để mở trang web cho phép bạn cấu hình tài khoản mạng wifi
Sau khi thiết lập xong tài khoản, ESP khởi động và cố gắng kết nối mạng lại;
Nếu nó thiết lập 1 kết nối, quy trình kết nối thành công, ngược lại, nó sự thiết lập một Access Point.

Trước khi bạn thực hành, bạn cần biết cách cấu hình module ESP8266 để lập trình trong Arduino. Nếu bạn đã cấu hình rồi, bạn có thể bỏ qua bước này:
http://www.dandientu.com/2018/02/lap-trinh-esp8266-esp-12e-nodemcu-su-dung-arduino.html
Trong bài này có sử dụng thư viện ArduinoJSON, cách sử dụng thư viện có trong bài:
http://www.dandientu.com/2018/03/giai-ma-du-lieu-thoi-tiet-qua-cau-truc.html
Cài đặt thư viện WiFiManager và ArduinoJSON
Bạn tải 2 thư viện từ đây
- WiFiManager
- ArduinoJSON
Sau khi tải về, giải nén và đặt lại tên thư mục cho thư viện WiFiManager-master thành WiFiManager, ArduinoJSON-master thành ArduinoJSON và chép vào thư mục thư viện của Arduino. Mở lại Arduino IDE.
Ví dụ #1 – WiFiManager với ESP8266: Tự động kết nối
Trong ví dụ này, thay vì bạn dùng code để khai báo tài khoản wifi thì bạn dùng thư viện WiFiManager .
Mã nguồn
/*********
  Rui Santos
  Complete project details at http://randomnerdtutorials.com
*********/
#
include < ESP8266WiFi.h >
  #include < DNSServer.h >
  #include < ESP8266WebServer.h >
  #include < WiFiManager.h > // https://github.com/tzapu/WiFiManager
  // Set web server port number to 80
  WiFiServer server(80);
// Variable to store the HTTP request
String header;
// Auxiliar variables to store the current output state
String output5State = "off";
String output4State = "off";
// Assign output variables to GPIO pins
const int output5 = 5;
const int output4 = 4;
void setup() {
  Serial.begin(115200);
  // Initialize the output variables as outputs
  pinMode(output5, OUTPUT);
  pinMode(output4, OUTPUT);
  // Set outputs to LOW
  digitalWrite(output5, LOW);
  digitalWrite(output4, LOW);
  // WiFiManager
  // Local intialization. Once its business is done, there is no need to keep it around
  WiFiManager wifiManager;
  // Uncomment and run it once, if you want to erase all the stored information
  //wifiManager.resetSettings();
  // set custom ip for portal
  //wifiManager.setAPConfig(IPAddress(10,0,1,1), IPAddress(10,0,1,1), IPAddress(255,255,255,0));
  // fetches ssid and pass from eeprom and tries to connect
  // if it does not connect it starts an access point with the specified name
  // here  "AutoConnectAP"
  // and goes into a blocking loop awaiting configuration
  wifiManager.autoConnect("AutoConnectAP");
  // or use this for auto generated name ESP + ChipID
  //wifiManager.autoConnect();
  // if you get here you have connected to the WiFi
  Serial.println("Connected.");
  server.begin();
}
void loop() {
  WiFiClient client = server.available(); // Listen for incoming clients
  if (client) { // If a new client connects,
    Serial.println("New Client."); // print a message out in the serial port
    String currentLine = ""; // make a String to hold incoming data from the client
    while (client.connected()) { // loop while the client's connected
      if (client.available()) { // if there's bytes to read from the client,
        char c = client.read(); // read a byte, then
        Serial.write(c); // print it out the serial monitor
        header += c;
        if (c == '\n') { // if the byte is a newline character
          // if the current line is blank, you got two newline characters in a row.
          // that's the end of the client HTTP request, so send a response:
          if (currentLine.length() == 0) {
            // HTTP headers always start with a response code (e.g. HTTP/1.1 200 OK)
            // and a content-type so the client knows what's coming, then a blank line:
            client.println("HTTP/1.1 200 OK");
            client.println("Content-type:text/html");
            client.println("Connection: close");
            client.println();
            // turns the GPIOs on and off
            if (header.indexOf("GET /5/on") >= 0) {
              Serial.println("GPIO 5 on");
              output5State = "on";
              digitalWrite(output5, HIGH);
            } else if (header.indexOf("GET /5/off") >= 0) {
              Serial.println("GPIO 5 off");
              output5State = "off";
              digitalWrite(output5, LOW);
            } else if (header.indexOf("GET /4/on") >= 0) {
              Serial.println("GPIO 4 on");
              output4State = "on";
              digitalWrite(output4, HIGH);
            } else if (header.indexOf("GET /4/off") >= 0) {
              Serial.println("GPIO 4 off");
              output4State = "off";
              digitalWrite(output4, LOW);
            }
            // Display the HTML web page
            client.println("<!DOCTYPE html><html>");
            client.println("<head><meta name=\"viewport\" content=\"width=device-width, initial-scale=1\">");
            client.println("<link rel=\"icon\" href=\"data:,\">");
            // CSS to style the on/off buttons
            // Feel free to change the background-color and font-size attributes to fit your preferences
            client.println("<style>html { font-family: Helvetica; display: inline-block; margin: 0px auto; text-align: center;}");
            client.println(".button { background-color: #195B6A; border: none; color: white; padding: 16px 40px;");
            client.println("text-decoration: none; font-size: 30px; margin: 2px; cursor: pointer;}");
            client.println(".button2 {background-color: #77878A;}</style></head>");
            // Web Page Heading
            client.println("<body><h1>ESP8266 Web Server</h1>");
            // Display current state, and ON/OFF buttons for GPIO 5
            client.println("<p>GPIO 5 - State " + output5State + "</p>");
            // If the output5State is off, it displays the ON button
            if (output5State == "off") {
              client.println("<p><a href=\"/5/on\"><button class=\"button\">ON</button></a></p>");
            } else {
              client.println("<p><a href=\"/5/off\"><button class=\"button button2\">OFF</button></a></p>");
            }
            // Display current state, and ON/OFF buttons for GPIO 4
            client.println("<p>GPIO 4 - State " + output4State + "</p>");
            // If the output4State is off, it displays the ON button
            if (output4State == "off") {
              client.println("<p><a href=\"/4/on\"><button class=\"button\">ON</button></a></p>");
            } else {
              client.println("<p><a href=\"/4/off\"><button class=\"button button2\">OFF</button></a></p>");
            }
            client.println("</body></html>");
            // The HTTP response ends with another blank line
            client.println();
            // Break out of the while loop
            break;
          } else { // if you got a newline, then clear currentLine
            currentLine = "";
          }
        } else if (c != '\r') { // if you got anything else but a carriage return character,
          currentLine += c; // add it to the end of the currentLine
        }
      }
    }
    // Clear the header variable
    header = "";
    // Close the connection
    client.stop();
    Serial.println("Client disconnected.");
    Serial.println("");
  }
}
Code sau đây sử dụng thư viện WiFiManager:
#include <DNSServer.h>

#include <ESP8266WebServer.h>

#include <WiFiManager.h>
Bạn tạo đối tượng WiFiManager :
WiFiManager wifiManager;
Và chạy autoConnect() :
wifiManager.autoConnect("AutoConnectAP");
Chỉ có vậy, chỉ thêm vài dòng code vào trong chương trình là bạn có thể cấu hình mạng wifi rồi.
Truy cập WiFiManager AP
Nếu lần đầu tiên chạy code WiFiManager cho bo ESP8266, bạn sẽ thấy thông tin in trong Arduino IDE Serial Monitor.

Bạn có thể sử dụng máy tính để kết nối vào AutoConnectAP
Access point:

Sau đó mở trình duyện và nhập địa chỉ IP: 192.168.4.1:
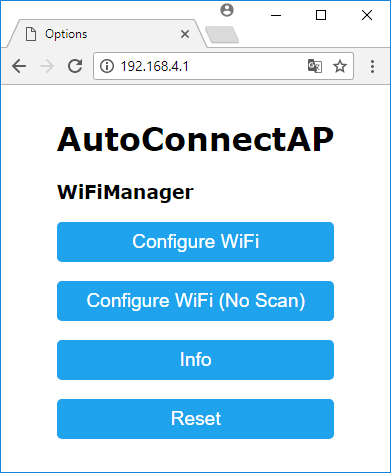
Cấu hình WiFi
Nhấp vào nút “Configure WiFi”:

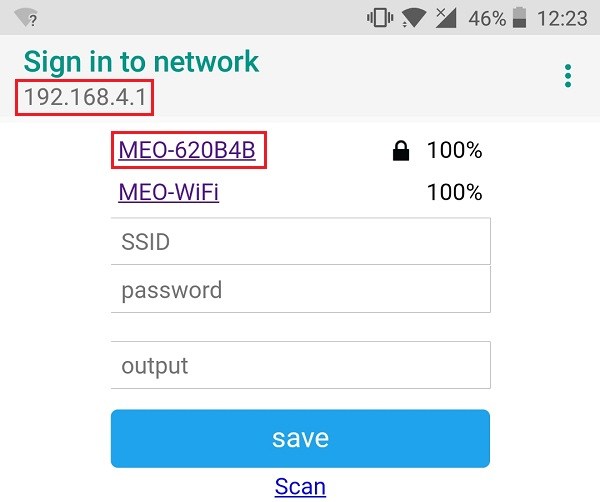
Chọn mạng muốn kết nối, nó sẽ tự lấy thông tin mạng cho bạn
(Ví dụ “MEO-620B4B”):

Sau đó nhập mật khẩu và nhấn “save“
Bạn sẽ thấy thông báo như sau:

Serial Monitor sẽ hiển thị kết quả dò tìm các Access
Point và thông tin trạng thái đã được lưu.

Nhấn nút RESET trên bo ESP để khởi động lại module, địa chỉ của nó sẽ hiển trong Serial Monitor (ví dụ 192.168.1.132):
Bạn mở trình duyện vào gõ IP này vào. Bạn sẽ thấy 1 trang web hiển thị ra như dưới đây, nó cho phép bạn điều khiển các GPIO

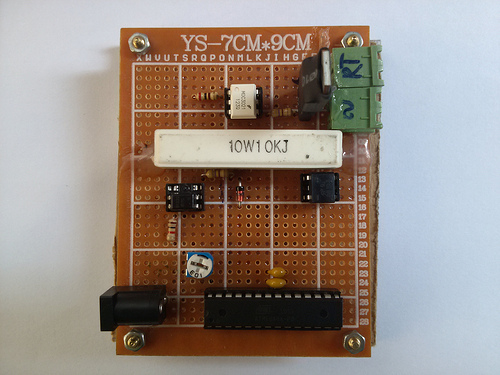
Linh kiện cần có
ESP82662x LED
2x điện trở (220 hoặc 330 ohms)
Breadboard
Sơ đồ kết nối:

Làm sao để xóa thông tin mạng wifi trên ESP8266
Sử dụng câu lệnh sau:
wifiManager.resetSettings();
Ví dụ #2 – WiFiManager với ESP8266 và cấu hình thông số
Thư viện WiFiManager có chức năng hữu dụng cho phép bạn thêm tham số là “Configure WiFi”. Nó cực kỳ hữu ích, một số ứng dụng cần thêm các giá trị như API Key, MQTT broker IP Address, gán 1 GPIO khác, kích hoạt 1 cảm biến, etc..
Mã nguồn
/*********

  Rui Santos

  Complete project details at http://randomnerdtutorials.com

*********/


#include <FS.h> //this needs to be first, or it all crashes and burns...

#include <ESP8266WiFi.h>

#include <DNSServer.h>

#include <ESP8266WebServer.h>

#include <WiFiManager.h>          // https://github.com/tzapu/WiFiManager

#include <ArduinoJson.h>          // https://github.com/bblanchon/ArduinoJson


// Set web server port number to 80

WiFiServer server(80);


// Variable to store the HTTP request

String header;


// Auxiliar variables to store the current output state

String outputState = "off";


// Assign output variables to GPIO pins

char output[2] = "5";


//flag for saving data

bool shouldSaveConfig = false;


//callback notifying us of the need to save config

void saveConfigCallback () {

  Serial.println("Should save config");

  shouldSaveConfig = true;

}


void setup() {

  Serial.begin(115200);


  //clean FS, for testing

  //SPIFFS.format();


  //read configuration from FS json

  Serial.println("mounting FS...");


  if (SPIFFS.begin()) {

    Serial.println("mounted file system");

    if (SPIFFS.exists("/config.json")) {

      //file exists, reading and loading

      Serial.println("reading config file");

      File configFile = SPIFFS.open("/config.json", "r");

      if (configFile) {

        Serial.println("opened config file");

        size_t size = configFile.size();

        // Allocate a buffer to store contents of the file.

        std::unique_ptr<char[]> buf(new char[size]);


        configFile.readBytes(buf.get(), size);

        DynamicJsonBuffer jsonBuffer;

        JsonObject& json = jsonBuffer.parseObject(buf.get());

        json.printTo(Serial);

        if (json.success()) {

          Serial.println("\nparsed json");

          strcpy(output, json["output"]);

        } else {

          Serial.println("failed to load json config");

        }

      }

    }

  } else {

    Serial.println("failed to mount FS");

  }

  //end read


  WiFiManagerParameter custom_output("output", "output", output, 2);


  // WiFiManager

  // Local intialization. Once its business is done, there is no need to keep it around

  WiFiManager wifiManager;


  //set config save notify callback

  wifiManager.setSaveConfigCallback(saveConfigCallback);


  // set custom ip for portal

  //wifiManager.setAPConfig(IPAddress(10,0,1,1), IPAddress(10,0,1,1), IPAddress(255,255,255,0));


  //add all your parameters here

  wifiManager.addParameter(&custom_output);


  // Uncomment and run it once, if you want to erase all the stored information

  //wifiManager.resetSettings();


  //set minimu quality of signal so it ignores AP's under that quality

  //defaults to 8%

  //wifiManager.setMinimumSignalQuality();


  //sets timeout until configuration portal gets turned off

  //useful to make it all retry or go to sleep

  //in seconds

  //wifiManager.setTimeout(120);


  // fetches ssid and pass from eeprom and tries to connect

  // if it does not connect it starts an access point with the specified name

  // here  "AutoConnectAP"

  // and goes into a blocking loop awaiting configuration

  wifiManager.autoConnect("AutoConnectAP");

  // or use this for auto generated name ESP + ChipID

  //wifiManager.autoConnect();


  // if you get here you have connected to the WiFi

  Serial.println("Connected.");


  strcpy(output, custom_output.getValue());


  //save the custom parameters to FS

  if (shouldSaveConfig) {

    Serial.println("saving config");

    DynamicJsonBuffer jsonBuffer;

    JsonObject& json = jsonBuffer.createObject();

    json["output"] = output;


    File configFile = SPIFFS.open("/config.json", "w");

    if (!configFile) {

      Serial.println("failed to open config file for writing");

    }


    json.printTo(Serial);

    json.printTo(configFile);

    configFile.close();

    //end save

  }


  // Initialize the output variables as outputs

  pinMode(atoi(output), OUTPUT);

  // Set outputs to LOW

  digitalWrite(atoi(output), LOW);;


  server.begin();

}


void loop(){

  WiFiClient client = server.available();   // Listen for incoming clients


  if (client) {                             // If a new client connects,

    Serial.println("New Client.");          // print a message out in the serial port

    String currentLine = "";                // make a String to hold incoming data from the client

    while (client.connected()) {            // loop while the client's connected

      if (client.available()) {             // if there's bytes to read from the client,

        char c = client.read();             // read a byte, then

        Serial.write(c);                    // print it out the serial monitor

        header += c;

        if (c == '\n') {                    // if the byte is a newline character

          // if the current line is blank, you got two newline characters in a row.

          // that's the end of the client HTTP request, so send a response:

          if (currentLine.length() == 0) {

            // HTTP headers always start with a response code (e.g. HTTP/1.1 200 OK)

            // and a content-type so the client knows what's coming, then a blank line:

            client.println("HTTP/1.1 200 OK");

            client.println("Content-type:text/html");

            client.println("Connection: close");

            client.println();


            // turns the GPIOs on and off

            if (header.indexOf("GET /output/on") >= 0) {

              Serial.println("Output on");

              outputState = "on";

              digitalWrite(atoi(output), HIGH);

            } else if (header.indexOf("GET /output/off") >= 0) {

              Serial.println("Output off");

              outputState = "off";

              digitalWrite(atoi(output), LOW);

            }


            // Display the HTML web page

            client.println("<!DOCTYPE html><html>");

            client.println("<head><meta name=\"viewport\" content=\"width=device-width, initial-scale=1\">");

            client.println("<link rel=\"icon\" href=\"data:,\">");

            // CSS to style the on/off buttons

            // Feel free to change the background-color and font-size attributes to fit your preferences

            client.println("<style>html { font-family: Helvetica; display: inline-block; margin: 0px auto; text-align: center;}");

            client.println(".button { background-color: #195B6A; border: none; color: white; padding: 16px 40px;");

            client.println("text-decoration: none; font-size: 30px; margin: 2px; cursor: pointer;}");

            client.println(".button2 {background-color: #77878A;}</style></head>");


            // Web Page Heading

            client.println("<body><h1>ESP8266 Web Server</h1>");


            // Display current state, and ON/OFF buttons for the defined GPIO

            client.println("<p>Output - State " + outputState + "</p>");

            // If the outputState is off, it displays the ON button

            if (outputState=="off") {

              client.println("<p><a href=\"/output/on\"><button class=\"button\">ON</button></a></p>");

            } else {

              client.println("<p><a href=\"/output/off\"><button class=\"button button2\">OFF</button></a></p>");

            }

            client.println("</body></html>");


            // The HTTP response ends with another blank line

            client.println();

            // Break out of the while loop

            break;

          } else { // if you got a newline, then clear currentLine

            currentLine = "";

          }

        } else if (c != '\r') {  // if you got anything else but a carriage return character,

          currentLine += c;      // add it to the end of the currentLine

        }

      }

    }

    // Clear the header variable

    header = "";

    // Close the connection

    client.stop();

    Serial.println("Client disconnected.");

    Serial.println("");

  }
Tạo thêm tham số
Để thêm tham số, bạn cần thao tác tập tin config.json lưu trong ESP. Bài nàu sẽ không giải thích làm thế nào làm việc với các tham số thêm vào, như cơ bản, nếu bạn muốn tạo thêm tham số, bạn cần làm theo các bước sau đây:
Trong ví dụ này, chúng ta sẽ tạo biến để lưu địa chỉ IP của một MQTT broker server.
Trong ví dụ này, chúng ta sẽ tạo biến để lưu địa chỉ IP của một MQTT broker server.
char output[2];

char mqtt_server[40];
Sau đó, nếu nó đã lưu trong file /config.json, bạn có thể sao chép nó:
strcpy(output, json["output"]);

strcpy(mqtt_server, json["mqtt_server"]);
Tạo một WiFiManagerParameter (tham số sẽ hiển thị trong “Configure WiFi” ):
WiFiManagerParameter custom_output("output", "output", output, 2);

WiFiManagerParameter custom_mqtt_server("server", "mqtt server", mqtt_server, 40);
Thêm biến như là 1 tham số:
wifiManager.addParameter(&custom_output);

wifiManager.addParameter(&custom_mqtt_server);
Kiểm tra và cập nhật các biến với các giá trị mới nhất:
strcpy(output, custom_output.getValue());

strcpy(mqtt_server, custom_mqtt_server.getValue());
Cuối cùng, nếu người dùng tạo giá trị vào 1 trong các tham số, nó sẽ được cập nhật vào file config.json :
strcpy(output, custom_output.getValue());

strcpy(mqtt_server, custom_mqtt_server.getValue());
Bạn có thể lập lại việc này để thêm tham số.
Truy cập WiFiManager
AP
Sử dụng điện thoại, máy tính, máy tính bảng kết nối vào
AutoConnectAP Access Point:
Bạn sẽ thấy 1 cửa sổ tương tự như hình bên dưới và nhấn nút “SIGN IN” :

Trang cấu hình WiFi
Bạn truy cập địa chỉ 192.168.4.để cấu hình WiFi , nhấn nút “Configure
WiFi” :
Chọn mạng cần kết nối (ví dụ “MEO-620B4B”):
Sau khi nhập mật khẩu, nhập số GPIO (ví dụ GPIO 5 thì nhập số
5) rồi nhấn “save“:
Quan sát trên Serial
Monitor :
- Quét tìm kiếm các Access Point;
- Thông tin trạng thái Wi-Fi sẽ được lưu lại;
- Xác nhận thông số ngõ ra (ví dụ GPIO5): {“output”:”5″}.

Truy cập web server
Now, if you RESET your ESP board, it will print the IP address in the Serial Monitor (in my case it’s 192.168.1.132):

Mở trình duyệt, nhập địa chỉ IP. Bạn sẽ thấy trang web như bên dưới, nó cho phép bạn điều khiển chân GPIO mà bạn đã định nghĩa ở dạng tắt hoặc mở:

Linh kiện và sơ đồ
1x Resistor (220 or 330 ohms should work just fine)
Ghi chú; Nếu bạn đã định nghĩa chân khác với chân GPIO 5 (là
chân D1 trên module NodeMCU), thì bạn cần làm lại phần cứng.

Chúc các bạn thành công
Nguồn: randomnerdtutorials.com


Nhận xét
Đăng nhận xét